Friends aaj ham janenge Windows Install Ya Format Karne Ke Liye Pendrive Ko Bootable Kaise Banaye | Bootable kya Hota Hai | Without Bootable Pendrive Se Windows Kaise Install kare.
Agar aap bhi aisa soch rahe hai tho tension lene ki koyi baat nahi hai. Kyuki aaj ke post me aapke saare sawal ke jawab mil jayenge. Bas aap mujhe follow karte rahe
Tho chaliye friends sabse pehle ham jante hai ki Bootable Actually hota kya hai ?
Bootable Kya Hai | What Is Bootable In Hindi
Friends hamhe Windows Install ya Format karne ke liye Bootable CD ya phir Bootable Pendrive ki jaroorat hoti hai. Basically Bootable Plug-In-Play jaisa hi hai. Hamhe Pendrive ko Laptop/Computer me lagane ke baad sirf laptop/Computer ko Restart karna hota hai. Phir bina koyi set-up kiye ham badi aasani se Windows ko Install kar sakte hai.
Without Bootable Kya Hai | What Is Without Bootable In Hindi ?
Friends Agar ham Pendrive ko Bootable nahi karte hai, tho sabse pehle hamhe apne system ke Boot Menu me jana hoga aur waha se Pendrive ko select karna hoga. Friends Actually iss process me thodi dikkat hoti hai. Aur sabko easily samaj me nahi aata hai. Tho kyu na ham simple or easy tarike se Bootable ko aajmaye, tho chaliye friends jante hai Pendrive ko Bootable kaise kiya jata hai.
Pendrive Ko Bootable Kaise Banaye Step-by-Step | How To Make Bootable Pendrive In Hindi ?
Friends Pendrive ko Bootable karna bahut hi aasan hai. Mai aapko 3 aasan aur popular method batane wala hu, bas aapko in steps ko ache se follow karte rahe
Method 1: Command Prompt Se Pendrive Ko Bootable Kaise Banaye ?
Step 1 : Friends sabse pehle aapko Command prompt open karna hai. Command Prompt open karne ke liye Windows Key + R ek sath press kare. Agar aap ko Windows key samaj me nahi aaye tho aap apne Keyboard ke left side ke last me Windows logo wali button hai or R button ek sath press kare
Step 2 : Ab aap ke samane Run ka Dialog Box open hoga aur uske ander aapko CMD type karke Enter kare.
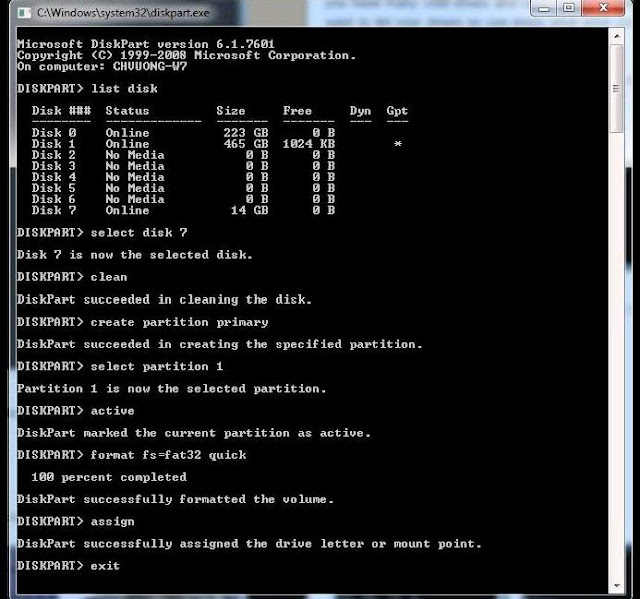
Step 3 : Ab aap ke samane CMD open ho gayi hai. CMD me kuch command dena hoga, usse pehle aap apne Pendrive ko System se connected kar ligiye aur Pendrive 4gb se upar wala hi lagaye. Sabse pehle Command de →Diskpart aur Enter button press kare. Jaise hi enter press karenge aap ko ek naya CMD milega ise Diskpart command kehte hai.
Step 4 : Ab aapko ek aur Command type karna hai → List Disk type karke enter press kare. Aap dekh sakte hai System me jitna bhi Disk hai wo sab show kar raha hai. Usme si aapke apna Pendrive wala disk select karna hai.
Example : Agar aap ka Pendrive Disk 4 me dikh raha hai. Tho aap ko Select Disk 4 type karke Enter button press kare.
Note : Is option ko sahise follow kare agar Clear lage tho hi aage badhe nahi tho niche comment karke apna doubt clear karle.
Step 5 : Friends ab hamhara disk select ho gaya hai. Ab aap ko niche diye commands ko ek-ek karke type karke Enter button press kare.
Step 6 :
Type Clear and Enter button press kare.
Type Create Partition Primary & Enter button press kare.
Type Select Partition 1 & Enter press kare.
Type Active & Enter Press kare.
Type Format fs=fat32 quick & Enter press kare.
100% complete hone ke baad Next command Assign type & press Enter button.
Aur last command type kare Exit aur Enter button press kare.
Tho friends aap ka Pendrive successfully Bootable ho gaya hai. Ab aapko agar Windows Install ya Format karna hai . Tho Windows O.S file Pendrive me copy karke system ko Restart kare aur aap aasani Windows Install ya Format kar sakte hai.
Tho friends agar aap ko is Method me kahi problem ho rahi hai tho Comment kare.
Method 2 : Refus Software Se Pendrive Ko Bootable Kaise Banaye ?
Step 1 : Friends sabse pehle aap ko Refus Software ko Download karna hai.
Step 2 : Download hone ke baad Refus ko Install kar run kare.
Step 3 : Friends aap apna Pendrive pc se connect kare.
- Pendrive select kare.
- GTP Partition Scheme For UFEI select kare.
- Default
- Default
- Default hi rakhe.
- ISO Image Select kare.
- Computer me save ki huyi Windows File ko open kare.
- Last me Start button par click kare.
Ab kuch time wait kare aur jab process poori ho jaye tho application ko close karde.
Friends aapka Bootable Pendrive ready ho gaya hai.
Method 3 : WiNToBootic Se Pendrive Ko Bootable Kaise Banaye ?
Step 1 : Friends sabse pehle WiNToBootic Software ko Download kare. Download Complete hone ke baad use unzip kare aur WiNToBootic ko run kare.
Download WiNToBootic
Step 2 : Ab apna Pendrive system se connect kare.
> Apna Pendrive Select Kare.
> Quick Format Par ✔ Tik kare.
Step 3 : Ab Drop Source par click kare aur Windows ISO file ko select kare.
Ab kuch is tarah dikhayi dega aur Do it! par click karde.
Step 4 : Ab aapka Pendrive format aur Windows copy hona start hone lagega.
Kuch der wait kare uske baad ek new window open hogi Contact writing me kuch time lagega. Complete hone ke baad Thanks par click karde.
Friends ab aapka Pendrive ready ho gaya hai Windows Install karne ke liye
Friends ab aap jan gaye honge ki Pendrive ko kaise bootable kiya jata hai. Agar aap ko Bootable karne me kisi method me dikhat aa rahi hai tho Comment jaroor kare.


4 Comments
Bahut Hi Achhe Se Samjhaya Aapne Sir
ReplyDeleteThanks bhai
DeleteWinload. Exe mising ho gaya hai iska Kya late sir please
ReplyDeleteWinload.exe ke baare me isiliye nahi bataye kyunki usme bahut error aate hain.
Delete